spring
spring框架介绍
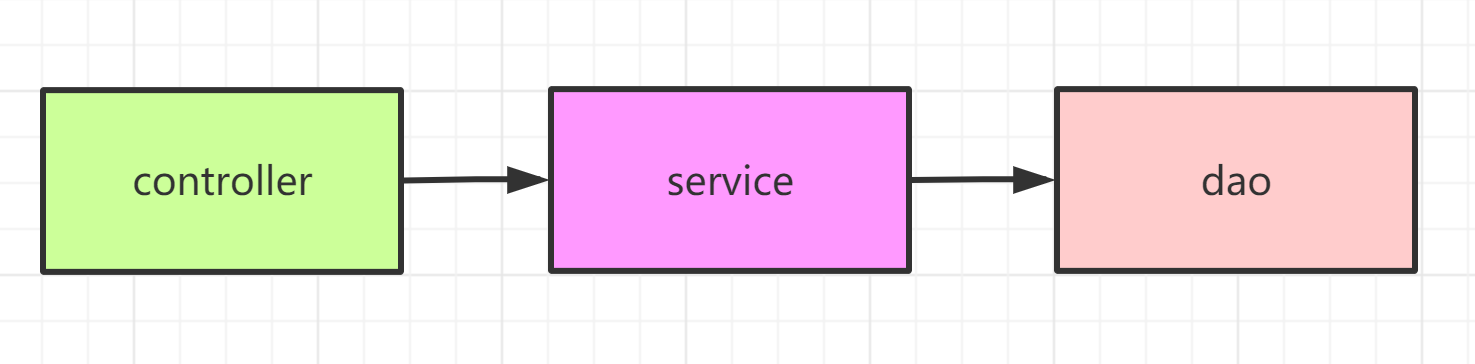
传统项目的架构
在传统的项目中,一般遵循MVC开发模型。
- view层与用户进行交互,显示数据或者将数据传输给view层。
- 在controller层创建service层对象,调用service层中业务方法。
- 在service层创建dao层对象,调用dao层中操作数据的方法。
- dao层进行具体的数据库操作
架构图
spring的核心组件
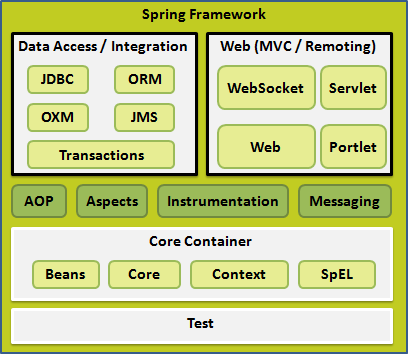
核心容器
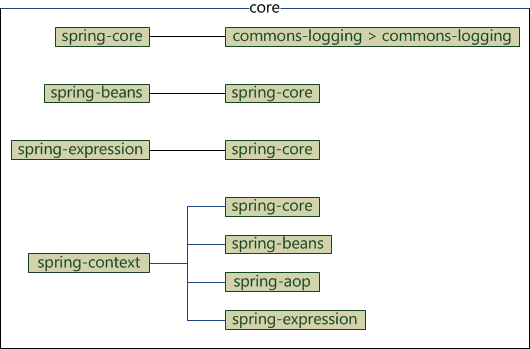
核心容器由 spring-core,spring-beans,spring-context,spring-context-support和spring-expression(SpEL,Spring 表达式语言,Spring Expression Language)等模块组成,它们的细节如下:
- spring-core 模块提供了框架的基本组成部分,包括 IoC 和依赖注入功能。
- spring-beans 模块提供 BeanFactory,工厂模式的微妙实现,它移除了编码式单例的需要,并且可以把配置和依赖从实际编码逻辑中解耦。
- context 模块建立在由 core和 beans 模块的基础上建立起来的,它以一种类似于 JNDI 注册的方式访问对象。Context 模块继承自 Bean 模块,并且添加了国际化(比如,使用资源束)、事件传播、资源加载和透明地创建上下文(比如,通过 Servelet 容器)等功能。Context 模块也支持 Java EE 的功能,比如 EJB、JMX 和远程调用等。ApplicationContext 接口是 Context 模块的焦点。spring-context-support 提供了对第三方库集成到 Spring 上下文的支持,比如缓存(EhCache, Guava, JCache)、邮件(JavaMail)、调度(CommonJ, Quartz)、模板引擎(FreeMarker, JasperReports, Velocity)等。
- spring-expression 模块提供了强大的表达式语言,用于在运行时查询和操作对象图。它是 JSP2.1 规范中定义的统一表达式语言的扩展,支持 set 和 get 属性值、属性赋值、方法调用、访问数组集合及索引的内容、逻辑算术运算、命名变量、通过名字从 Spring IoC 容器检索对象,还支持列表的投影、选择以及聚合等。
依赖关系图
数据访问/集成
数据访问/集成层包括 JDBC,ORM,OXM,JMS 和事务处理模块,它们的细节如下:
(注:JDBC=Java Data Base Connectivity,ORM=Object Relational Mapping,OXM=Object XML Mapping,JMS=Java Message Service)
- JDBC 模块提供了 JDBC 抽象层,它消除了冗长的 JDBC 编码和对数据库供应商特定错误代码的解析。
- ORM 模块提供了对流行的对象关系映射 API 的集成,包括 JPA、JDO 和 Hibernate 等。通过此模块可以让这些 ORM 框架和 spring的其它功能整合,比如前面提及的事务管理。
- OXM 模块提供了对 OXM 实现的支持,比如 JAXB、Castor、XML Beans、JiBX、XStream 等。
- JMS 模块包含生产(produce)和消费(consume)消息的功能。从 Spring 4.1 开始,集成了 spring-messaging 模块。
- 事务模块为实现特殊接口类及所有的 POJO 支持编程式和声明式事务管理。(注:编程式事务需要自己写 beginTransaction()、commit()、rollback() 等事务管理方法,声明式事务是通过注解或配置由 spring 自动处理,编程式事务粒度更细)
web层
- Web 层由 Web,Web-MVC,Web-Socket 和 Web-Portlet 组成,它们的细节如下:
- Web 模块提供面向 web 的基本功能和面向 web 的应用上下文,比如多部分(multipart)文件上传功能、使用 Servlet 监听器初始化 IoC 容器等。它还包括 HTTP 客户端以及 Spring 远程调用中与 web 相关的部分。
- Web-MVC 模块为 web 应用提供了模型视图控制(MVC)和 REST Web服务的实现。Spring 的 MVC 框架可以使领域模型代码和 web 表单完全地分离,且可以与 Spring 框架的其它所有功能进行集成。
- Web-Socket 模块为 WebSocket-based 提供了支持,而且在 web 应用程序中提供了客户端和服务器端之间通信的两种方式。
- Web-Portlet 模块提供了用于 Portlet 环境的 MVC 实现,并反映了 spring-webmvc 模块的功能。
其他
- 还有其他一些重要的模块,像 AOP,Aspects,Instrumentation,Web 和测试模块,它们的细节如下:
- AOP 模块提供了面向方面(切面)的编程实现,允许你定义方法拦截器和切入点对代码进行干净地解耦,从而使实现功能的代码彻底的解耦出来。使用源码级的元数据,可以用类似于.Net属性的方式合并行为信息到代码中。
- Aspects 模块提供了与 AspectJ 的集成,这是一个功能强大且成熟的面向切面编程(AOP)框架。
- Instrumentation 模块在一定的应用服务器中提供了类 instrumentation 的支持和类加载器的实现。
- Messaging 模块为 STOMP 提供了支持作为在应用程序中 WebSocket 子协议的使用。它也支持一个注解编程模型,它是为了选路和处理来自 WebSocket 客户端的 STOMP 信息。
- 测试模块支持对具有 JUnit 或 TestNG 框架的 Spring 组件的测试。
Bean标签的属性介绍
id
- 是 bean的唯一标识 一个bean,其id 值只能有一个 。整个IOC 容器id 值不允许重复,使用名称作为key
name
- 一个bean的名称,可以存在多个,多个之间使用逗号分隔。不论bean有没有定义name属性,默认id都会当做name。
class
- bean的具体的类型,包名和类名组成。
scope
- bean的作用域
- prototype :非单例,每次获取都会创建一个新的bean对象。
- singleton : 单例,多次获取永远同一个bean, 默认值。
- request : 一次请求,基于web项目的bean的作用域。
- session : 一次会话,基于web项目的bean的作用域。
lazy-init
- 延迟初始化,默认只要加载了配置文件。bean对象就会被初始化,lazy-init则是获取时才会初始化。只针对单例模式有效,非单例每次获取都会创建,没有延迟初始化的意义
depends-on
- 初始化时依赖的对象,当前对象初始化前需先初始化depends-on指定的对象
init-method
- 对象初始化后,调用的方法
destroy-method
- 对象销毁时,调用的方法
autowire
属性自动装配
byName 根据属性名称装配
byType 根据类型装配
autowire-candidate
是否允许作为自动装配的候选项
true 作为自动装配的候选项
false 不作为自动装配的候选项
primary
- 优先使用该bean,因为Spring需要支持使用类型查找对象,在一个大类型下,可能存在多个小类型。如果根据大类型装配属性时,不知道使用哪个具体的对象,则可以根据primary设置优先级。
Bean对象创建的方法
构造方法创建
<bean id="user" class="com.abc.domian.User" />
静态工厂创建
<!--
    id : bean 的唯一标识
    class : 工厂类
    factory-method : 工厂方法
 -->
<bean id="user2" class="com.abc.factory.UserStaticFactory" factory-method="getObj" />
非静态工厂创建
<!--
    非静态工厂创建对象
        在非静态工厂中,创建对象的方法是非静态方法。非静态方法的执行,首先需要该类对象
        注意: 使用非静态工厂创建对象,首先需要创建工厂类对象
-->
<!-- 工厂类对象 -->
<bean id="userFactory" class="com.abc.factory.UserFactory" />
<!-- 使用非静态工厂创建对象 -->
<!--
    factory-bean : 非静态工厂对象
    factory-method : 创建对象的非静态方法
-->
<bean id="user3" factory-bean="userFactory" factory-method="getObj" />
注解创建
组件注解
@Component
表示该类为一个被Spring管理的组件。但是,由于在开发中为了让代码的可读性更高。
Spring基于分层思想,将需要创建的组件分为以下几类:
@Controller
@Controller注解,标识该类是controller层的类。并且,注意在使用SpringMVC时,所有的Constroller,必须使用@Controller注解。
@Service
@Service注解,标识该类是业务层的类。
@Respository
@Respository注解,标识该类是操作数据层的类。
注解使用步骤
在spring的核心配置文件中,开启注解扫描,让Spring将被注解修饰的类,创建对相关。
<!--
    开启组件扫描
 -->
<context:component-scan base-package="com.abc.*" />
将需要交给spring管理的类上面标上对应的注解
import org.springframework.stereotype.Component;
@Component
public class Person {

    public Person(){
        System.out.println("Person的构造方法.........");
    }
}
ioc属性注入
构造方法属性注入
<?xml version="1.0" encoding="UTF-8"?>
<beans xmlns="http://www.springframework.org/schema/beans"
       xmlns:xsi="http://www.w3.org/2001/XMLSchema-instance"
       xsi:schemaLocation="http://www.springframework.org/schema/beans http://www.springframework.org/schema/beans/spring-beans.xsd">
        <!-- 无参构造方法 -->
        <bean class="com.abc.domain.User" />
        <!--
           有参数的构造方法
                此时是2个参数的构造方法
                index : 参数下标  从 0开始
                value : 属性的值
         -->
        <bean id="user2" class="com.abc.domain.User" >
            <constructor-arg index="0" value="1001" />
            <constructor-arg index="1" value="韩梅梅" />
        </bean>
        <!-- 有参数的构造方法
                使用index下标查找 属性 存在问题 都只有一个参数 则默认使用后面的构造方法
                可以使用 type 指定参数的类型
                更推荐 使用name属性 : name表示构造器中参数的名称
         -->
        <bean id="user3" class="com.abc.domain.User">
            <constructor-arg index="0" value="1001" type="java.lang.Integer"  />
        </bean>
        <bean id="user4" class="com.abc.domain.User">
                <constructor-arg name="name" value="韩梅梅" />
        </bean>
</beans>
set方法属性注入
<?xml version="1.0" encoding="UTF-8"?>
<beans xmlns="http://www.springframework.org/schema/beans"
       xmlns:xsi="http://www.w3.org/2001/XMLSchema-instance"
       xsi:schemaLocation="http://www.springframework.org/schema/beans http://www.springframework.org/schema/beans/spring-beans.xsd">
         <!--
           使用set方法进行属性注入
            property 表示属性
                name : 表示属性对应的set方法名,去掉set前缀,首字母小写。并不是真正的属性名
         -->
        <bean id="student1" class="com.abc.domain.Student">
           <property name="studentId" value="1001" />
        </bean>
</beans>
注解属性注入
在spring中,为了简化属性的注入,Spring提供注解:**@Autowired**,Spring会自动从IOC容器中,为这个属性查找相应类型的值,进行注入。
public class Student { public Integer id; public String name; @Autowired //使用注解自动注入 //User 对象 public User user; public void setStudentId(Integer id) { System.out.println("set方法被调用了............"); this.id = id; } /* public void setUser(User user) { this.user = user; }*/ }注意:在使用自动注入时,可以在bean标签上,配置autowire,但是此时必须有该属性的set方法,**@Autowired**注解,是不需要set方法的。
如果是在xml中注入对象,值使用ref属性。value属性,只支持boolean,数字,字符串等。
AOP代理
aop简介
- 代理:静态代理
- 静态代理,每个被代理类都需要创建对应的代理类。随着程序的扩展,代理类也会增多,臃肿,维护量变多,为了解决这个问题,Java中,提供了动态代理技术,开发者不需要自己定义代理类,代理类由JDK动态的创建,开发只需要指定被代理的类即可。
动态代理
JDK动态代理
proxy
该类提供了方法创建代理类和代理类的对象的方法
创建一个代理类并返回代理类对象
static Object newProxyInstance(ClassLoader loader, Class[] interfaces, InvocationHandler h)
loader :// 类加载器,指定类加载器,是为了精确的定位类
interfaces : // 接口Class类,使用JDK的反射,必须要有接口
h :InvocationHandler ,//代理的处理器,每个代理类都有一个关联的处理器
InvocationHandler
是每个代理类对应的处理器
Object invoke(Object proxy,Method method,Object[] args)
Object  //方法调用的返回值,可以作为被代理的方法调用的返回值
proxy : //代理类对象
method : //目标类中被代理的方法
args : //目标类中被代理的方法的运行参数
例子如下
//目标接口类
public interface Agent {
    void rent();
    void rent2(int i);
}
//目标类
public class FangDong implements Agent{
    @Override
    public void rent() {
        System.out.println("租房1000元");
    }

    @Override
    public void rent2(int i) {
        System.out.println("第二套房");
    }
}
//代理增强类
public class MyRent implements MethodBeforeAdvice {

    @Override
    public void before(Method method, Object[] objects, Object o) throws Throwable {
        System.out.println("增加500元");
    }
}
cglib动态代理
MethodInterceptor
cglib中,提供的对方法执行拦截的接口。其中intercept是对具体方法进行拦截处理的方法。
public Object intercept(Object obj, java.lang.reflect.Method method, Object[] args,
                               MethodProxy proxy)
Object  :// 方法执行返回的结果
obj ://增强类的对象
method ://目标方法
proxy ://用于回调的方法的对象
例子如下
//代理增强类
public class MyMethodInterceptor implements MethodInterceptor {
    @Override
    public Object intercept(Object o, Method method, Object[] objects, MethodProxy methodProxy) throws Throwable {
        System.out.println("多收5000元租金");
        return methodProxy.invokeSuper(o,objects);
    }
}
//目标类
public class Fangdong {
    public void sent() {
        System.out.println("房子出租1000元");
    }
}
//测试类
public class App {
    public static void main(String[] args) {
        Enhancer enhancer = new Enhancer();
        enhancer.setSuperclass(Fangdong.class);
        enhancer.setCallback(new MyMethodInterceptor());
        Fangdong fangdong = (Fangdong) enhancer.create();
        fangdong.sent();
    }
}
spring的AOP配置
AOP的相关概念
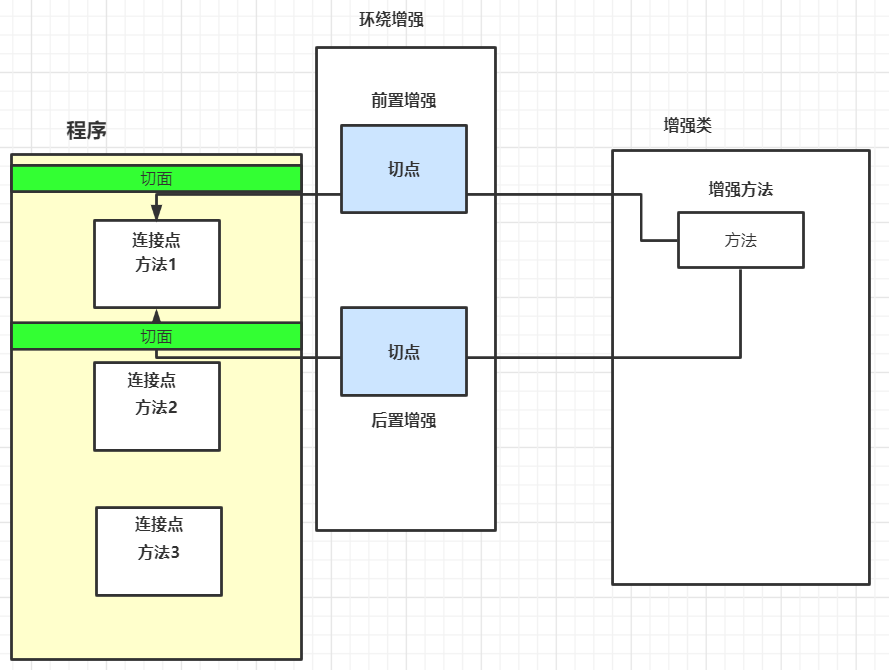
- **连接点(JoinPoint)**:所谓连接点是指那些被拦截的点,而spring中这些点就是指方法,因为spring只支持方法类型的连接点。
- **切入点(PointCut)**:所谓切入点就是指我们要对那些JoinPoint进行拦截的定义,指的是具体的拦截的位置
- 增强/通知(Advice) : 增强就是对具体的连接点进行扩展的功能。由于一般对方法进行增强,分为在方法前执行或者方法后,或者发生异常执行等等,所以增强被分为:前置增强(前置通知)、后置增强(后置通知)、环绕通知(环绕增强)、异常增强(异常通知)
- **引介(Introduction)**:引介是一种特殊的Advice,在不修改代码的前提下,引介可以在运行期为类动态的添加一些方法或Field.
- 目标(Target) :被代理的类(需要增强类)
- 织入(Weaving) :把Advice应用到Target的过程
- 代理(Proxy):使用AOP配置后产生的代理类
- 切面(Aspect):切点和增强整合形成了切面
AOP增强图
前置增强-MethodBeforeAdvice
后置增强-AfterReturningAdvice
环绕增强-MethodInterceptor
异常增强-ThrowsAdvice
aop配置
<?xml version="1.0" encoding="UTF-8"?>
<beans xmlns="http://www.springframework.org/schema/beans"
       xmlns:xsi="http://www.w3.org/2001/XMLSchema-instance" xmlns:aop="http://www.springframework.org/schema/aop"
       xsi:schemaLocation="http://www.springframework.org/schema/beans http://www.springframework.org/schema/beans/spring-beans.xsd http://www.springframework.org/schema/aop https://www.springframework.org/schema/aop/spring-aop.xsd">

    <!-- 定义目标类对象 -->
    <bean id="targetClass" class="com.abc.impl.TargetClassImpl" />
    <!-- 定义增强类对象 前置增强类 -->
    <bean id="myBeforeAdvice" class="com.abc.advice.MyBeforeAdvice" />
    <!-- 定义增强类对象  后置增强 -->
    <bean id="myAfterAdvice" class="com.abc.advice.MyAfterAdvice" />
    <!-- 定义增强类 环绕增强 -->
    <bean id="myAroundAdvice" class="com.abc.advice.MyAroundAdvice" />
    <!-- 定义增强类  异常增强类 -->
    <bean id="myExceptionAdvice" class="com.abc.advice.MyExceptionAdvice" />
    <!-- 进行织入 -->
    <aop:config>
        <!--
            id : 连接点的唯一标识
            expression : 连接点的表达式
                execution(* 包名.类名.方法名(..))
                * 指任意字符
                .. 表示参数可以是任意个
        -->
        <aop:pointcut id="beforePoint" expression="execution(* com.abc.impl.TargetClassImpl.targetMethod(..))"/>
        <!-- 后置增强的切点 -->
        <aop:pointcut id="afterPoint" expression="execution(* com.abc.impl.TargetClassImpl.afterTargetMethod(..))"/>
        <!-- 环绕增强的切点 -->
        <aop:pointcut id="aroundPoint" expression="execution(* com.abc.impl.TargetClassImpl.aroundTargetMethod(..))"/>
        <!-- 异常增强的切点 -->
        <aop:pointcut id="exceptionPoint" expression="execution(* com.abc.impl.TargetClassImpl.runException(..))"/>
        <!--
            织入
            将增强和连接点 结合
        -->
        <aop:advisor advice-ref="myBeforeAdvice" pointcut-ref="beforePoint" />

        <!-- 织入
            后置增强的织入
         -->
        <aop:advisor advice-ref="myAfterAdvice" pointcut-ref="afterPoint" />

        <!--
            织入
            环绕增强的织入
        -->
        <aop:advisor advice-ref="myAroundAdvice"  pointcut-ref="aroundPoint" />

        <!--
          织入
          异常增强的织入
      -->
        <aop:advisor advice-ref="myExceptionAdvice"  pointcut-ref="exceptionPoint" />
    </aop:config>

</beans>
AspectJ框架AOP配置
编写增强类
public class MyAdvice {

    public void beforAdvice(){
        System.out.println("前置增强的方法");
    }

    public void afterAdvice(String name,String rs){
        System.out.println("后置增强的方法");
    }

    public void aroundAdvice(ProceedingJoinPoint joinPoint){
        System.out.println("前置增强");
        try {
            joinPoint.proceed();
        } catch (Throwable throwable) {
            throwable.printStackTrace();
        }
        System.out.println("后置增强");
    }

    /**
     * 异常增强
     * @param exception
     */
    public  void exceptionAdvice(Exception exception){
        System.out.println("异常增强!");
    }
}
编写目标类
public interface ITargetClass {

    /**
     * 前置增强的方法
     */
    void  beforeMethod();

    /**
     * 后置增强的方法
     */
    String afterMethod(String name1);

    /**
     * 环绕增强的方法
     */
    void aroundMethod();

    /**
     * 异常增的方法
     */
    void runExceptionMethod();
实现类
public class TargetClassImpl  implements ITargetClass {

    @Override
    public void beforeMethod() {
        System.out.println("待前置增强--------beforeMethod");
    }

    @Override
    public String afterMethod(String name) {
        System.out.println("待后置增强--------afterMethod");
        return  "韩梅梅";
    }

    @Override
    public void aroundMethod() {
        System.out.println("待环绕增强--------aroundMethod");
    }

    @Override
    public void runExceptionMethod() {
        System.out.println("待异常增强--------runExceptionMethod");
        int m = 0;
        int n = 100/m;
    }
}
配置AspectJ的增强配置
<?xml version="1.0" encoding="UTF-8"?>
<beans xmlns="http://www.springframework.org/schema/beans"
       xmlns:xsi="http://www.w3.org/2001/XMLSchema-instance" xmlns:aop="http://www.springframework.org/schema/aop"
       xsi:schemaLocation="http://www.springframework.org/schema/beans http://www.springframework.org/schema/beans/spring-beans.xsd http://www.springframework.org/schema/aop https://www.springframework.org/schema/aop/spring-aop.xsd">

    <!-- 定义增强的目标类对象 -->
    <bean id="targetClass" class="com.abc.impl.TargetClassImpl" />
    <!-- 定义增强类的对象 -->
    <bean id="myAdvice" class="com.abc.advice.MyAdvice" />

    <!-- 进行AOP配置 -->
    <aop:config>
        <!-- 前置切点 -->
        <!--
              aop:before : aspectJ中 前置增强的配置
               method : 当前增强类中前置增强的方法  方法名
               pointcut-ref : 增强连接点
           -->
        <aop:pointcut id="beforPoint" expression="execution(* com.abc.impl.TargetClassImpl.beforeMethod(..)) " />
        <!-- 后置切点 -->
        <!-- args 配置被增强的方法的参数名称 -->
        <aop:pointcut id="afterPoint" expression="execution(* com.abc.impl.TargetClassImpl.afterMethod(..)) and args(name)"   />
        <!-- 环绕切点 -->
        <aop:pointcut id="aroundPoint" expression="execution(* com.abc.impl.TargetClassImpl.aroundMethod(..))"  />
        <!-- 异常切点 -->
        <aop:pointcut id="exceptionPoint" expression="execution(* com.abc.impl.TargetClassImpl.runExceptionMethod(..))" />

        <aop:aspect ref="myAdvice">
          <!--  <aop:before method="beforAdvice" pointcut-ref="beforPoint" />-->
            <!--
                arg-names :后置增强中增强的方法的参数名称
                    注意: name 也是被增强的方法的参数名称 参数名称要一致
                returning :返回结果的参数名称
            -->
           <aop:after-returning method="afterAdvice" pointcut-ref="afterPoint" arg-names="name,rs"   returning="rs" />

            <!--<aop:around method="aroundAdvice" pointcut-ref="aroundPoint"  />-->
             <!--
                 throwing : 接收异常参数的名称
             -->
           <aop:after-throwing method="exceptionAdvice" pointcut-ref="exceptionPoint" throwing="exception"  />
        </aop:aspect>
    </aop:config>
</beans>
声明式事务
xml版本事务
xml事务配置
<?xml version="1.0" encoding="UTF-8"?>
<beans xmlns="http://www.springframework.org/schema/beans"
       xmlns:xsi="http://www.w3.org/2001/XMLSchema-instance"
       xmlns:context="http://www.springframework.org/schema/context"
       xmlns:tx="http://www.springframework.org/schema/tx" xmlns:aop="http://www.springframework.org/schema/aop"
       xsi:schemaLocation="http://www.springframework.org/schema/beans
       http://www.springframework.org/schema/beans/spring-beans.xsd
       http://www.springframework.org/schema/context
       https://www.springframework.org/schema/context/spring-context.xsd
       http://www.springframework.org/schema/tx
       http://www.springframework.org/schema/tx/spring-tx.xsd http://www.springframework.org/schema/aop https://www.springframework.org/schema/aop/spring-aop.xsd">


    <!--关联数据库的配置信息-->
    <context:property-placeholder location="classpath:db.properties"/>

      <!--注入service-->
    <bean id="accountService" class="com.abc.service.impl.AccountServiceImpl" >
    </bean>

    <!--注入数据源-->
    <bean id="dataSource" class="com.alibaba.druid.pool.DruidDataSource"
          init-method="init" destroy-method="close">
        <property name="driverClassName" value="${db.driver}"/>
        <property name="username" value="${db.username}"/>
        <property name="password" value="${db.password}"/>
        <property name="url" value="${db.url}"/>
    </bean>

    <bean id="configuration" class="org.apache.ibatis.session.Configuration">

        <!-- 指定日志工具 -->
        <property name="logImpl"  value="org.apache.ibatis.logging.log4j.Log4jImpl" />
        <!-- 配置缓存 -->
        <property name="cacheEnabled" value="true" />

        <!--懒加载-->
        <property name="aggressiveLazyLoading"  value="false"/>
        <property name="lazyLoadingEnabled" value="true"/>
        <property name="lazyLoadTriggerMethods" value="clone"/>
    </bean>
    <!--注入sqlSessionFactory工厂对象-->
    <bean id="sessionFactory" class="org.mybatis.spring.SqlSessionFactoryBean">

        <!--配置属性 MyBatis 的主配置文件-->
        <property name="configuration" ref="configuration"/>
        <!--配置数据源-->
        <property name="dataSource" ref="dataSource"/>
        <!--配置类的别名-->
        <property name="typeAliasesPackage" value="com.abc.domain"/>
        <!--配置关联mapper的xml
         要想省掉 它,必须要求,mapper的接口和xml文件编译之后在一个文件夹中-->
     <!--   <property name="mapperLocations" value="classpath*:**/*Mapper.xml"/>-->
        <!--配置分页插件-->
        <property name="plugins">
            <array>
                <bean class="com.github.pagehelper.PageInterceptor">
                    <property name="properties">
                        <value>
                            helperDialect=mysql
                            reasonable=true
                            autoRuntimeDialect=true
                        </value>
                    </property>
                </bean>
            </array>
        </property>
    </bean>
    <!--配置Mapper接口的扫描器
      这个扫描器 是专门 扫描 mapper 接口所在的包,给这些mapper接口 创建代理对象
      里面的参数设置 包的设置必须是mapper的包
     -->
    <bean  class="org.mybatis.spring.mapper.MapperScannerConfigurer">
        <property name="basePackage" value="com.bjpowernode.mapper"/>
    </bean>


     <!-- aop 机制 通过面向切面编程的思想,给程序添加事务处理-->
     <!--配置事务处理器 相当于 我们以前写的 增强类-->
    <bean id="transactionManager"  class="org.springframework.jdbc.datasource.DataSourceTransactionManager">
        <!--配置数据源-->
         <property name="dataSource" ref="dataSource"/>
    </bean>

    <!--对什么方法 做什么增强-->
    <tx:advice id="advice" transaction-manager="transactionManager">
         <tx:attributes>
             <!--
               name : 进行数据库操作方法的名称  add* 表示 add开头的方法  * 指代任意字符
               propagation : 事务传播性  面试重点
               read-only : 只读事务  默认 false
               rollback-for : 指定回滚的异常  默认是 RunTimeException 下的异常会自动回滚
               no-rollback-for : 不回滚的异常
               timeout : 事务的超时时间
               isolation : 事务隔离级别  面试重点
                   | 1. 读未提交
                   | 2. 读已提交
                   | 3. 可重复读
                   | 4. 串行化
           -->
             <tx:method name="find*" read-only="true"/>
             <tx:method name="get*" read-only="true"/>
             <tx:method name="select*" read-only="true"/>
             <tx:method name="query*" read-only="true"/>
             <tx:method name="list*" read-only="true"/>
             <!--isolation="DEFAULT" 隔离级别 默认隔离级别 不用写 propagation 传播行为 默认的-->
             <tx:method name="*" propagation="REQUIRED" isolation="DEFAULT"/>
         </tx:attributes>
    </tx:advice>

    <!--aop 的配置-->
    <aop:config>

        <!--切入点-->
         <aop:pointcut id="pointcut" expression="execution(* com.abc.service.impl.*Impl.*(..))"/>

        <!--织入-->
        <aop:advisor advice-ref="advice" pointcut-ref="pointcut"/>

    </aop:config>
</beans>
注解版声明事务,配置
<?xml version="1.0" encoding="UTF-8"?>
<beans xmlns="http://www.springframework.org/schema/beans"
       xmlns:xsi="http://www.w3.org/2001/XMLSchema-instance"
       xmlns:context="http://www.springframework.org/schema/context"
       xmlns:tx="http://www.springframework.org/schema/tx" xmlns:aop="http://www.springframework.org/schema/aop"
       xsi:schemaLocation="http://www.springframework.org/schema/beans
       http://www.springframework.org/schema/beans/spring-beans.xsd
       http://www.springframework.org/schema/context
       https://www.springframework.org/schema/context/spring-context.xsd
       http://www.springframework.org/schema/tx
       http://www.springframework.org/schema/tx/spring-tx.xsd http://www.springframework.org/schema/aop https://www.springframework.org/schema/aop/spring-aop.xsd">


    <!--关联数据库的配置信息-->
    <context:property-placeholder location="classpath:db.properties"/>

      <!--注入service-->
    <bean id="accountService" class="com.abc.service.impl.AccountServiceImpl" >
    </bean>

    <!--注入数据源-->
    <bean id="dataSource" class="com.alibaba.druid.pool.DruidDataSource"
          init-method="init" destroy-method="close">
        <property name="driverClassName" value="${db.driver}"/>
        <property name="username" value="${db.username}"/>
        <property name="password" value="${db.password}"/>
        <property name="url" value="${db.url}"/>
    </bean>

    <bean id="configuration" class="org.apache.ibatis.session.Configuration">

        <!-- 指定日志工具 -->
        <property name="logImpl"  value="org.apache.ibatis.logging.log4j.Log4jImpl" />
        <!-- 配置缓存 -->
        <property name="cacheEnabled" value="true" />

        <!--懒加载-->
        <property name="aggressiveLazyLoading"  value="false"/>
        <property name="lazyLoadingEnabled" value="true"/>
        <property name="lazyLoadTriggerMethods" value="clone"/>
    </bean>
    <!--注入sqlSessionFactory工厂对象-->
    <bean id="sessionFactory" class="org.mybatis.spring.SqlSessionFactoryBean">

        <!--配置属性 MyBatis 的主配置文件-->
        <property name="configuration" ref="configuration"/>
        <!--配置数据源-->
        <property name="dataSource" ref="dataSource"/>
        <!--配置类的别名-->
        <property name="typeAliasesPackage" value="com.abc.domain"/>
        <!--配置关联mapper的xml
         要想省掉 它,必须要求,mapper的接口和xml文件编译之后在一个文件夹中-->
     <!--   <property name="mapperLocations" value="classpath*:**/*Mapper.xml"/>-->
        <!--配置分页插件-->
        <property name="plugins">
            <array>
                <bean class="com.github.pagehelper.PageInterceptor">
                    <property name="properties">
                        <value>
                            helperDialect=mysql
                            reasonable=true
                            autoRuntimeDialect=true
                        </value>
                    </property>
                </bean>
            </array>
        </property>
    </bean>
    <!--配置Mapper接口的扫描器
      这个扫描器 是专门 扫描 mapper 接口所在的包,给这些mapper接口 创建代理对象
      里面的参数设置 包的设置必须是mapper的包
     -->
    <bean  class="org.mybatis.spring.mapper.MapperScannerConfigurer">
        <property name="basePackage" value="com.abc.mapper"/>
    </bean>


     <!-- aop 机制 通过面向切面编程的思想,给程序添加事务处理-->
     <!--配置事务处理器 相当于 我们以前写的 增强类-->
    <bean id="transactionManager"  class="org.springframework.jdbc.datasource.DataSourceTransactionManager">
        <!--配置数据源-->
         <property name="dataSource" ref="dataSource"/>
    </bean>
    <!--事务注解驱动-->
     <tx:annotation-driven transaction-manager="transactionManager"/>
</beans>
service代码
@Transactional(propagation = Propagation.REQUIRED,isolation = Isolation.DEFAULT)
public class AccountServiceImpl implements IAccountService {

    @Autowired
    private AccountMapper accountMapper;

    @Transactional // 方法上添加事务 或者类上添加事务注解 都可以
    // 添加在类上,表示类中的所有方法都有事务
    // 添加在方法上,表示该方法有事务
    public void transMoney(String sourceName, String targetName, BigDecimal money) {
          // 开启事务
        accountMapper.subMoney(sourceName,money);
        int i = 1/0;
        accountMapper.addMoney(targetName,money);
        // 提交事务
        // 回滚事务
    }
}
事务的传播性
| 传播级别 | 说明 | 描述 |
|---|---|---|
| REQUIRED | 必须的 | 默认值,表示当前若存在事务则使用当前事务,若不存在则创建一个新的事务 |
| SUPPORTS | 支持的 | 表示当前若存在事务则在当前事务中执行,若不存在则在非事务中执行 |
| MANDATORY | 强制性的 | 表示必须在事务中执行,若当前没有事务则抛出异常 |
| NEVER | 绝不 | 表示一定不在事务中的执行,若当前存在事务则报错 |
| NESTED | 嵌套的 | 若当前存在事务,则创建一个子事务,嵌套在当前事务中,注意,外层事务出现异常会回滚子事务,子事务出现异常,不影响外层事务 |
| REQUIRES_NEW | 必须新建 | 表示无论当前是否存在事务,都会创建一个新的事务,在新的事务中执行 只支持JtaTransactionManager |
| NOT_SUPPORTED | 不支持事务 | 表示不论当前是否存在事务,都不会在事务中执行。只支持JtaTransactionManager |